Vented drains help maintain a free flow of water coming out of a sink. As a result, it is good to have it as a plumbing feature in your house drainage.
In this comprehensive guide, we explain how to vent your kitchen sink drain and more. Read on and you will clear the question of whether venting is good for a kitchen sink.
Does a Kitchen Sink Drain need a Vent?
While venting a sink is a good idea, sometimes people may assume that a kitchen sink may not need one. However, this may not be true as the benefits of venting are far more important and necessary.
A kitchen sink drain needs to be vented to prevent clogging and ensure the free flow of water and liquids from the sink. Also, venting a kitchen sink allows air to enter behind the water that is flowing out. This prevents debris, oil, and fat, from sticking on the wall of the drain. This also helps prevent gurgles and glugs.
Vented drains also help do away with odors that come from the kitchen sink. Several vents from your house features should join the main vent stack that extends through the roof.


How to Vent a Kitchen Sink?
The plumbing code recommends specific requirements for the pipe size used and the placement of sink vents. To vent a kitchen sink, the following must be done:
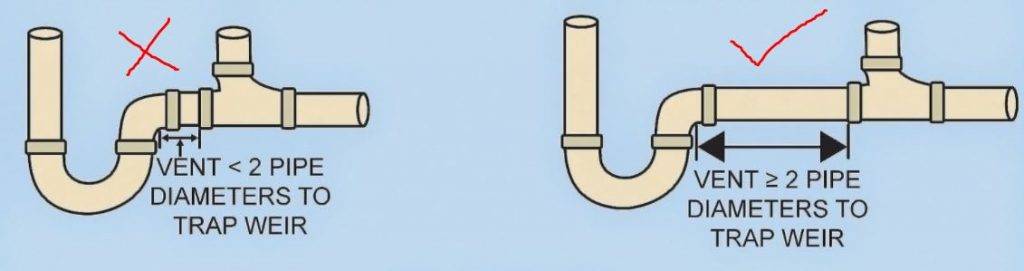
- In between where the waste line leading from the trap drops to the sewer and the P-trap of the sink drop install a vent. The feet length between the vent and the trap should be two times the diameter in inches of the waste line. If the waste line diameter is 1 ¼ inch, then the vent should not be more than 2 ½ feet far from the trap. The distance is 3 feet if the waste line is 1 ½ inch.
- Use plastic pipe cement to glue a sanitary tee to the waste line at the point where the vent will be connected. If it’s within critical distance the point can be at the place where the waste line drops vertically. If the point is within the critical distance you can then glue the waste line to the perpendicular tee port. The sweep should face downward. The parallel ports should face up and down.
- If you want to install the vent before the waste line drops vertically you can adjust the orientation of the tee. When you get one parallel port glued to the waste line you can now continue the waste line from another parallel port. Angle the sweep away from the drain and face the perpendicular port up.
- To the port of the tee that is facing up glue 1 ¼ inch PVC pipe. 1 ½ and 2-inch pipes can be used if they are more convenient. For convenience, the pipe can be tied to existing vents but ideally, the pipes should rise through the roof.
- Identify a point where you can connect the pipe to another vent and route it through the walls. Make sure that the pipe does not slope downward. The pipe should only be allowed to rise at an angle or run horizontally.
- Use a hacksaw to cut the existing vent pipe. Make sure that the sweep angle is up and the perpendicular port of the pipe is facing the new vent line before gluing it in a sanitary tee.
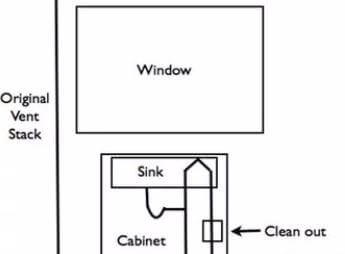
How to vent a kitchen sink under a window?
Everyone loves a kitchen sink placed under the window. Doing the dishes as you look through the window is a luxury that many desire to have. You also do not need additional lighting during the day to wash your dishes if the kitchen sink is placed under the window. Plumbing can get hard sometimes and people may choose to install sinks in other places in the kitchen.
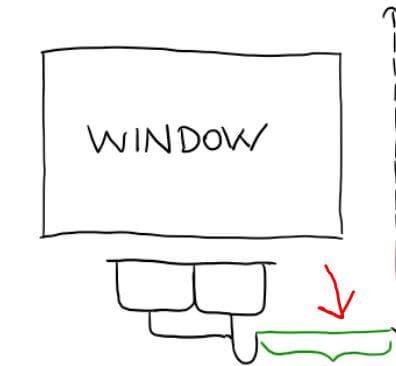
If there is a window blocking a vent pipe there is a procedure that needs to be followed to install the vent pipes. For the vent to clear the window the vent is run horizontally. The route then returns to vertical when the vent clears the window. A slight and upward slope should be included in the horizontal section because it cannot slope downwards.
The following is the procedure for venting kitchen sinks under a window. Every step is important and should be followed carefully.
- In the sink drain line that is inside the wall cavity install a sanitary tee. This sanitary tee should not be installed using a length that exceeds three and a half feet from the bottom of the P-trap. The PVC sanitary tee should also be used for a 2-inch waste line. Use the PVC cement to glue the pipe coming from the sink and the sanitary tee together. The continuation of the drain should be glued to the other side of the sanitary tee. Here, ensure also that the 1 1/2 inch port is facing upward.
- Use a hacksaw to cut a 2-inch length pipe from the one-and-a-half-inch PVC pipe and glue it to the sanitary tee one-and-a-half-inch port. A sweep elbow that is parallel to the wall should be glued to the pipe.
- Use chalk to draw a line to a point beyond the window. This should be a point that the pipe can turn upward. The line should have an upward slope of ¼ inch per foot. This means that the line should rise at least an inch if the point is 4 feet away from the elbow.
- Use a drill and a hole saw to drill 1 5/8 holes into studs between the elbow and the point where the vent rises. Each hole on the line should be centered.
- Take the 1 ½ inch pipe and cut it to a length that will fit the distance between the elbow and the point where the vent rises. Insert the pipe through the holes and get it glued to the elbow. With its outlet facing forward, now glue to the other side of the pipe, glue a second elbow.
- Extend the vent into the attic after drilling a 1 5/8-inch hole into the top plate of the wall. It should be routed horizontally to the main vent stack. Tie the drilled hole with some reduced sanitary tee that should fit the stack and the main vent.
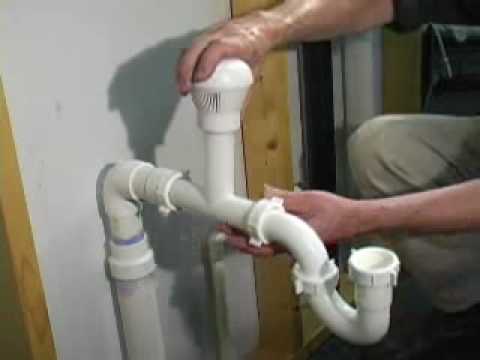
How to Vent a Kitchen Sink Drain
Venting a kitchen sink drain is important to enhance the ventilation of your kitchen and improve drainage. It is not easy to vent kitchen sink drains. The following is the simplified procedure for installing vent pipes in your kitchen:
- Connecting the sink and the waste drainpipe.
- Selecting the configuration of the vent pipe.
- Attaching the pipe to the opening
- Drawing a chalk line to the wall studs’ sides to reflect the length of the drain
- Drilling a 1 ¾ -inch hole through the middle of each wall stud.
- Adding a second elbow fitting.
- Installing a straight-up vertical PVC vent pipe up to the attic.
- Attaching another PVC elbow.
- Connecting the vent pipe to the stack
What happens if you don’t vent a drain?
There is usually no big difference between vented and unvented drains. Some plumbers try to create huge differences that are not there. Unvented drains work just fine but it is not recommended as proper plumbing.
Even though vented drains function better in terms of clearing odors and enhancing proper drainage, the difference is unnoticeable in everyday usage.
The only drains that need drains are the toilet drains. Toilet drains with no vents will often need more than one flash to evacuate the waste from the bowl completely.
Check out a guide on how to connect a P-Trap to a wall drain to learn more about sink drains.
Does every drain need a vent pipe?
Though it is not a must-have necessity, every drain needs to have a vent pipe. Every drain whether it’s the shower, toilet, sink, or floor drain needs venting. Vents facilitate the prevention of airlocks by allowing atmospheric pressure in drains.
Drains that do not have vents experience a slow drainage process because enough airlock does not occur.
Apart from the slow drainage, drains that are not vented make gurgling noises. Water in the trap could siphon out in unvented drains and result in an unwanted potent sewer smell.
Also, have good drainage outside the house to avoid your kitchen sink draining into the yard or the garden when blocked.
How far can a sink drain be from the vent?
This length is commonly known as the critical distance. How far the sink can be from a vent pipe is determined by the following factors:
- The type of sink you are installing.
- The pipe sizes that the code requires.
If the sink is located too far from the vent stack, then the sink’s drainage pipe should have its vent stack connection piping. On the sink drain piping, the usual slope is ¼ of slope per 12 feet of horizontal distance.
You can also consider using a washer while connecting the drain pipes. Read how to install slip joint washers in this article on the same sink plumbing topic.

As a homeowner, I am specifically keen on home improvement. I am passionate about homes, yards, and home improvement. I blog on home ideas and reviews on solutions that make homes better.