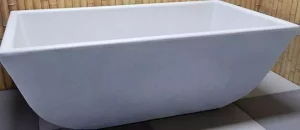
Want to know how you can build a concrete bathtub on your own? This post offers a step-by-step guide with all the valuable tips and solutions. Building a concrete bathtub is a project that requires careful work, but it is possible to make this type of bathtub alone.
Proper water hygiene is a must. But many people lack the opportunity to have a bathtub at home. In this article, we will show you how to create a concrete bathtub with simple tools, materials, and measurements.
Materials you Need
Concrete mix 1 bucket
- Water 1 liter
- Bucket 5 liters (for mixing)
- Wood or plastic tape 2 rolls
- Wooden sticks for reinforcement 2 pcs. (Dimensions: 2 m. x 2 cm. x 2 cm.)
- Plywood plate 1 pc. (Thickness: 3 cm., size: 150 cm. x 150 cm.) OSB board 1 pc. (Thickness: 3 Cm. size: 180 cm. x 100 cm.) – for lateral walls;
- PVC tube 0.3 m long, diameter 20 mm – for pouring concrete into the mold;
- Two wooden planks (size: 50 cm. x 50 cm.) of wood with a thickness of 5 mm;
- Adhesive tape and plastic film for lining the formwork;
The Steps to build a freestanding concrete bathtub
The basic steps that you should follow when building a freestanding tub made of concrete are:
Step One
- Measure and lay out the tub’s location and size.
- Make a wooden mold, in this case, make one with plywood of 3/4 “thickness. The pieces must fit well together, so the cement does not leak out.
- To give support to the tub, put 4 steel bars in the mold. These bars have to be at least 3 cm from the sides of the mold because when you remove the mold later you can break it. It is important that the tub has good resistance and does not bend. Use an overhead saw to cut away the existing flooring where the tub will be.
Step Two
- Prepare for the Concrete
- Layout your tub dimensions on the ground and mark them with spray paint. Build the form needed for the concrete to create the shape of your tub. The form should be from plywood and 2x4s. Use screws to assemble it so you can remove it easily.

- Place plastic sheeting on the ground where you will set up your tub. This will help prevent staining of your floor. Place your form on top of the plastic sheeting, making sure you center it in the marked location for your bathtub.
- Use wood glue to secure a piece of wood (1/2-inch thick) around the inside edge of your mold’s bottom at a height equal to the depth you want your finished bathtub to be. Let dry completely before proceeding further. This piece will create a flat bottom inside your bathtub once poured, which prevents water from pooling on one side or another.
Step 3
- Mix the concrete in a large plastic basin following the instructions on the bag. Mix only as much as you can pour in 30 minutes. Wet the inside of your mold with water, then spray it with one part cooking oil and two parts water to prevent the concrete from sticking to it.
- Pour the mixture into your mold until it is level with the top edge. Screed off any excess concrete from the top of your mold using a 2×4 or a straight piece of wood and allow it to cure for 24 hours.
Step 4
- Remove the Bathtub Mold by lifting your mold off of your bathtub and placing it onto its side, then unscrew one of its sides. Remove this side and use an electric drill with a bit made for drilling through metal to drill several holes in your bathtub where it meets each wooden side.
- Pass a reciprocating saw blade back and forth through these holes to cut through your tub’s walls, then remove them from the rest of the tub by pulling them away. Sand down rough edges around holes made by your reciprocating saw, then clean up dust and debris from your tub with a shop vacuum or broom and dustpan.
- To allow your workmanship to dry well, have a safe portable bathtub to use during this time.
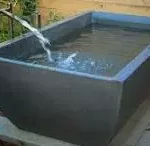
How to Build a Larger Outdoor Concrete Bathtub
1. Prepare your work area by putting down plastic sheeting to protect your floor, then fill one tub with water.
2. Add the cement and mix it well until it is completely dissolved in the water. You can add more cement if you want a thicker consistency or more water if you want a thinner consistency. The amount of cement you use will depend on how thickly you want your finished product to be.
It is best to start with a little less cement than you think is key because it’s easier to add some later on than take it back out if there’s too much!
3. Add only enough water so that the mixture becomes like pancake batter or oatmeal consistency — not too thin or too thick. If this happens just add some more water until desired consistency is optimal, then continue mixing until all lumps are gone before pouring into the mold.
4. The final step is to add insulation. Use fasteners, screws, and washers to hold the insulation in place on the bottom of the tub, as well as on the sides of the tub.
At this point, you are through with the most labor intensive part of making an outdoor concrete bathtub. The rest is just the finishing touches and decoration!

As a homeowner, I am specifically keen on home improvement. I am passionate about homes, yards, and home improvement. I blog on home ideas and reviews on solutions that make homes better.