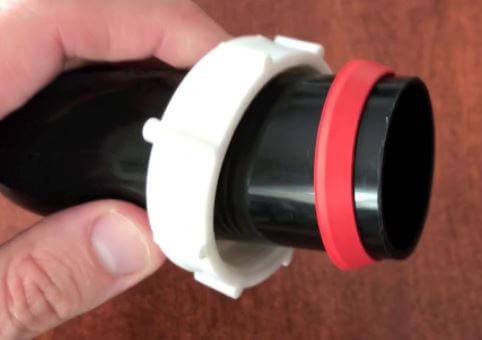
Slip joints help seal leaks in sinks. They have plastic or metal slip nuts that have a washer beneath them. When the slip nut is tightened the washer is compressed hence forming a seal that prevents leakage.
Also Read: 12 best Bathtubs for Seniors & Walk-In Tubs for elderly shower
How to Install Slip Joint Washers in Plumbing?
The following is the process of installing a slip joint washer:
- First, prepare the pipe. Make sure you cut it to the right length. Use a cloth or rag to remove any burrs that may be present on the end of the pipe.
- The second step is sliding the slip nut onto the pipe. As you slide it make sure that the threads are facing the end of the pipe that you have prepared. For sink basket strainers tailpiece, make sure that you first slide another slip nut on and that the threads are facing the tail-pieces self-seating end.
- The third step is sliding the slip joint washer onto the pipe. Make sure that the thicker edge of the slip joint washer faces the slip nut and that the washer fits snugly against the pipe. To allow the pipe room to slide into the threaded fitting, ensure that you slide the washer approximately 2 inches away from the edge of the pipe.
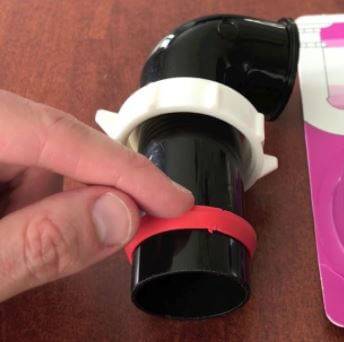
- The fourth step is tightening the slip joint. To tighten the slip joint, do the following:
- Ensure that the pipe slips into the flared fitting by slipping it into the threaded fitting.
- If you notice that the fitting is not flared, continue pushing the pipe until the washer is in the threaded fitting.
- Now press the slip joint washer down until the tapered end snug against the thread fitting and fits in straight.
- Finally slide the slip joint nut over the slip joint washer and tighten it using your hand until it’s snugs onto the threads.
- The fifth and final step is checking for leaks. Before checking tighten any other slip joint. Now turn the water on and check for leaks.
If there are leaks, use a pair of pliers to tighten the slip joint until the leak stops or tighten the slip joint nut a quarter turn.
If the leakage does not stop, loosen the nut and check whether the slip joint washer was not installed backward against the slip nut on the tapered end.
Re-tighten the washer onto the threads and makes sure you don’t over-tighten it.


How do you Put a Washer in a Pipe?
Drains use pipes with washers installed on slip joints to prevent leakage. Threaded drains are attached to the pipe openings with slip-joint nuts and slip joint washers. To put a washer in a pipe is a simple procedure.
A nut that is placed on the pipe is screwed towards the end of an opening of a drain pipe or the pipe threaded end.
Screwing the nut tight causes pressure of the connection forcing the washer up against the drain end and the pipe end. This creates a watertight connection.
To put a washer in a pipe, follow the following process:
- First, make sure that the open side of the metal nut is facing up as you slide the nut to the top of the pipe.
- Now insert the plastic washer inside the pipe. Make sure that the short side of the washer is facing down. This ensures that the washer will fit inside the opening of the pipe and that the collar of the washer will rest on the top of the pipe.
- On the threaded ends of the pipe or drain, you are going to install the washer to apply pipe thread sealant on an even layer.
- Using an adjustable wrench turn the washer clockwise to tighten the nuts on to drain and pipe end already threaded. Screw the nut tight and make a watertight seal with the washer by giving it a quarter turn.
Also Read: 10 ways how to Remove hard water Stains from Porcelain Sinks
How do you Install a P-Trap Washer?
P-trap washers are used with p-traps and are also known as slip joint washers. Rubber and plastic p-trap washers are used with different pipe materials.
You will need to know the sizes of washers and slip joints nuts that fit with your sink plumbing. To install your p-trap washers you will need to do the following:
- Install the slip joint nuts on the drain pipe and the waste drain pipes that you will connect your p-trap to.
- Slide the washers on the drain pipe from the sink and on the waste drainpipe.
- Now connect the p-trap to the sink drain pipe and the waste drain pipes.
- After connecting tighten the slip joints nuts using your hand.
- When everything is in place, turn on the water and check for leakages.
- If there are no leakages use the water pump pliers to slightly tighten the nuts. If there are leakages tighten the slip joints nuts until the leakage stops.
If you notice white deposits on the p-trap after a certain time, your washers are leaking and need to be re-tightened or replaced. Read more about how to connect a p-trap to a drain to understand it better.
How to Use Slip Joint Washers?
Slip joint washers can be used in several areas. They are essential in plumbing to avoid leaks. Slip joint washers can be used to plumb wall drains, floor drains, install p-traps, pipes. Before purchasing a washer, you should consider the size of your appliances.
The type of washer also matters. There are rubber washers mostly used in drains, plain washers, spring washers among others. To use slip joint washers, you will require to purchase slip joint nuts that will help tighten them into place to achieve their purpose.
How do you Install a PVC Slip Joint?
A PVC slip joint consists of a plastic nut which beneath it is a rubber slip-joint washer. To install a slip joint you will need to slide a slip joint pipe into the pipe.
Slide the washer into the pipe and compress it with the nut to form a slip joint which forms a seal against leaks. The slip joint is located at the point where the sink drain pipes meet the waste drain pipes.
While this is on the sink pipes, it is good to understand about a sink vent. Check out the steps to vent a kitchen sink drain on this guide so that you can know how to do things right there.
How do you Fix a Leaking Slip Joint?
P-traps are mostly used to connect the sink drain pipes to the waste drain pipes. These p-traps enable the installation of slip joints. A slip joint may start leaking if the slip nut cracks or the slip joints washer tots or cracks.
To fix the slip joint, therefore, you will need to replace the slip joint washer and nuts through the following process:
- Turn off the faucet and place a bucket or a mob beneath the trap to catch water from the pipes and p-trap once you remove it.
- Turn the slip nut anti-clockwise to unscrew it. Use your hand or the slip-nut wrench to loosen the nut. If you notice that the slip nut had a crack remove it.
- Alternatively, remove the slip joint washer if you unscrew the nut and find that the washer had worn out and was the source of the leak. If the two were cracked, remove them all.
- Clean the end of the tubing.
- Slide in the new slip joint nut, the new slip-joint washer, or both depending on what caused the crack. The slip nut tapered end should face the end of the tube.
- Reinstall the p-trap back and tighten the slip nut using your hand.
- Turn on the water and check if the leaks have stopped. If not tighten the nuts until the leakage stops.
How do you Put a Washer in a Pipe?
- Ensure the open side of the slip nut is facing up and slide it to the PVC pipe’s top.
- Face the short side of the washer down and insert it into the pipe to make sure that it is well-fitting on the inside of the pipe opening. The collar of the washer should rest on the pipe’s top.
- On the threaded end of the pipe or drain that you are going to install the washer smear an even layer of sealant.
- Use an adjustable wrench to turn the nut clockwise to tighten the washer on the drain end. Ensure that the nut is tight. Give the nut another quarter turn to make a water seal with the washer.
Also Read: Best stainless steel Kitchen sinks that don’t scratch: Resistant
Which way do Rubber Washers Go?
Rubber washers should go the nut side. The thicker side of the washers should always be the slip nut. It is the nut that is movable and also commonly turned to tighten the connection.
The rubber washers should also be on the threaded fitting of the pipe. Tightening the nut on the threads will seal the rubber washer onto the connection to avoid any form of leakage if properly fixed.

As a homeowner, I am specifically keen on home improvement. I am passionate about homes, yards, and home improvement. I blog on home ideas and reviews on solutions that make homes better.