A kitchen sink is arguably the most vital part of your kitchen. This means it has to be functioning properly all the time. However, leaking under the kitchen sink is a very common problem that you may not avoid as long as your sink is infrequent use.
Most kitchen sink leaks are easy to notice because of the evidence of water drops on the floor. However, there are slight leaks that can be difficult to notice. For this reason, you should not ignore unnoticeable sink damages or leaks lest they escalate and become bigger problems.
As a homeowner or tenant, always make efforts to locate and fix small damages in your sink. You can fix important parts such as the gasket, strainers or flange without the need of a professional.
What is a Kitchen Sink Gasket?
Most of the kitchen sink parts are prone to wear because of the constant water flow that creates moisture. The gasket and flange are very important parts of the sink.

The gasket is a part that creates a vital seal and link between the sink and the drainpipe.
This means if it malfunctions, there is no doubt that water will begin to seep out from the sink and cause leakages.
The gasket is a very sensitive part because of the exposure to water. It is the part of the sink that endures constant temperature fluctuations whenever you use your sink.
Even if you apply precaution, always know that the gasket will wear out sooner or later.
The beginning of leaks on this part of the sink can inflict further damages to the entire sink or kitchen area.
Causes Of Kitchen Sink Gasket Leaking
It is important to know the causes of the leaks before you begin to fix. Kitchen sink gasket leaking occurs as a result of drain leaks, damages on pipes, bad washers or the P-trap being faulty.
A lot of clogging or debris in the sink area can also cause the gasket to be faulty. Another possible cause of leaking can be as a result of wearing. This is unavoidable because of the moist condition caused by running water.
How to Repair and Fix a Leaking Kitchen Sink Gasket
If you tackle repairs earlier, there is likelihood that you may avoid incurring the cost of hiring a professional plumber. The best move is to detect slight leaks as earlier as possible before the problem escalates to complex levels.
Below is a simple guide to help you repair and fix leaking kitchen sink gasket:

- Start by turning off any circuit breakers around the sink. Also, shut off the garbage disposal system if it has been installed. This is a good preparation that will eliminate any possible chances of accidents occurring when you are working.
- Get rid of any objects or items stored under the sink. This also helps you to get adequate space for working. More importantly, ensure that you have a flashlight for proper illumination when you are plumbing.
- Proceed to detach the drain pipe from the sink using a wrench. There are possibilities that it may not budge. If this is the case, slight lubrication will help to loosen the grip by lubricating the joints.
- The connection of the gasket to the sink is supported by nuts. There are also sink gasket assemblies that use nuts and bolts. Loosen and remove them or push them upwards.
- With the nuts and bolts out of your way, the gasket will now be easy to lift out of the sink. The presence of water and moisture can make it stick but the use of a flathead screwdriver will help to push it out.
- You can now access the gasket and the flange to check if there are any damages. Use a wire brush to clean them and ensure there are no dirty particles left. The same should apply to the sink drain area in order to remove any sediments or dirt. This ensures that the gasket you are going to fit back will adhere accurately.
- Apply putty on the section where the flange, gasket and sink are going to connect. Place the new gasket on the flange and ensure it fits perfectly. A little pressing will ensure that any excess putty comes out.
- Proceed to put screw the nuts and bolts back to their respective place. Make sure they are tight as you reconnect the pipe with the use of a wrench. With the use of a clean piece of cloth, wipe away the excess putty.
These are easy steps that you can follow to repair or replace your gasket. Afterwards, run the tap to ensure the connection was accurate and there are no leakages.
Best 3 Kitchen Sink Gaskets to Replace With
1. Kone strainer sink Gasket
This is a standard size gasket that can fit most of the sink strainers. It is sturdy and durable because of the superior quality of rubber.
It is appropriate for repairing and replacement of sink strainers. This rubber gasket is all you need to stop leaks under your sink.

2. Sioux chief Gidds Gasket
This is a no putty gasket that can create tight seals on your finishes. It has a perfect design that can appropriately fit into standard drain attachments.
3. LDR 501 2000 sink Gasket
If you want to completely do away with sink leaks, this is one of the best gaskets for replacement.
It can fit most of the standard basket strainers of a sink. It comes with easy to follow installation steps.
How to Replace/Install New Kitchen Sink Gasket
Leaking of the gasket in the sink strainer is common. Commercial sinks and domestic sinks use similar DIY concepts when replacing or installing. Here are important steps to follow:
- Remove the top ring that has tabs. This is the ring that connects the strainer to the kitchen sink. A screwdriver and hammer are some of the tools you will need.
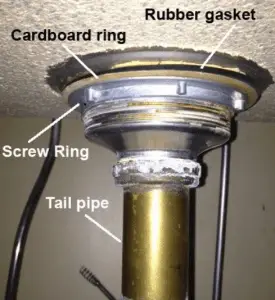
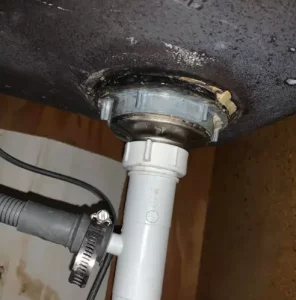
- Household sinks have a tailpipe. This is the pipe that connects to the strainer. Proceed to remove the rings by turning them in a counterclockwise manner. Jamming a tool like a screwdriver into the basket can prevent it from spinning. Be cautions so as to avoid breaking tabs.
- After removing the strainer, clean it thoroughly as well as all the sink surfaces. The cleaning helps to get rid of old putty before you can do any replacement.
- Purchase a new gasket from a local store. Rubber gaskets that have cardboard rings are the best for domestic kitchens.
- In case you are using the old sink strainer, there could be presence of putty on the inside part. Rub it out by sanding and wrap around new putty on the strainer. After drying, place the strainer back in its right position. Pressing down will ensure that the excess putty comes out.
- Put your new gasket on the strainer. This should be approached from underneath. After that, put back the cardboard ring then proceed to screw the plastic rings. Ensure the force is not excess when screwing to avoid breakages.
- Finally, reattach the tailpipe that serves as a connection between the sink and the drain pipe. You can then run the water to confirm if there are more leakages. More tightening of the rings can do the trick in case you observe more leakages.
Are Puttyless Sink Strainer Gaskets Better?
Non-putty sink gaskets are slowly replacing the putty types because of several reasons. These types of gaskets can create a tighter seal on finishes or sink materials.
Moreover, they are advantageous to plumbers because installation is easy. Peeling and sticking is all you need to do. Non-putty gaskets are easy to stack and do not stain or create mess. These are some of the reasons why puttyless sink strainer gaskets are better.

As a homeowner, I am specifically keen on home improvement. I am passionate about homes, yards, and home improvement. I blog on home ideas and reviews on solutions that make homes better.