At some point, everyone will run into a plumbing issue in their home. Many plumbing problems can be a real headache, but you can save yourself from this agony with some minor know-how and careful preparation.
If the pipe under the kitchen sink is leaking and you lack any experienced plumbing skills, this article will guide you through the replacement process.
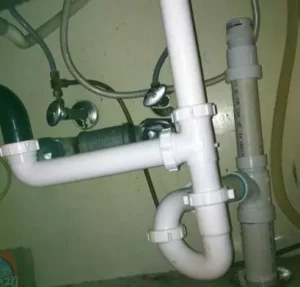
How to Fix Hole in Pipe Under Kitchen Sink
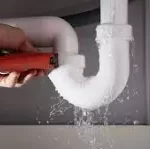
A hole or crack in one of the plastic pipes that brings water to your kitchen sink can be quite annoying. The repair will involve a few basic tools and supplies, which you can easily get at a home center or hardware store.
Step One: Repairing a Hole in the Pipe Under the Kitchen Sink
Identify the pipe with the hole or crack in it. If the pipe is leaking water, shut off the valve that controls it (usually located under the kitchen sink). To do so, turn it clockwise until it stops moving.
Step Two: Turn off the Water Supply
- If there are no valves near the pipe, turn off all water by closing the main valve to your house. In most modern homes this will mean going outside and turning off the water supply at the mains or backflow valve.
- You may also have an isolation valve on the water pipe leading into your home, if so close this as well. If you are unsure about how best to turn off your water supply then contact a plumber and get their advice before attempting any further steps.
Step Three: Remove Pipes from the Sink
- Once you’ve turned off the water supply, it is time to remove the pipes from the sink. Just loosen up the nuts connect them with an adjustable wrench and pull them away from the sink.
- Place these aside for now but do not dump them down the drain. That is because there could still be some residual water in them which will pour out when you remove the pipes from their connection inside.
Step Four
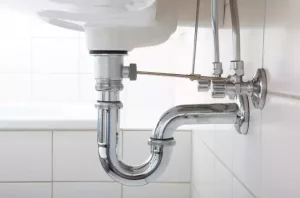
- Place a bucket under the P-trap to catch dripping water. Loosen and remove the nut holding the trap in place with slip-joint pliers or an adjustable wrench, depending on its configuration.
- Remove the trap from the drainpipe and let it sit in the bucket to drain excess water. If you are replacing a corroded trap, take this opportunity to clean out any debris that may have accumulated in the joints of the pipes.
- Place a bead of epoxy putty around the hole or crack in your pipe, building it up slightly higher than your pipe’s surface. Set aside for 10 minutes and follow instructions on the package for the exact drying time before proceeding to the next step.
- Reattach your trap and tighten it with slip-joint pliers or an adjustable wrench (depending on your setup). Turn on the water to fill the sink, then drain to test if the leak is securely fixed.
How to Replace Elbow Pipe Under Sink
When one of these pipes breaks, it can cause quite a mess that is difficult to clean up. It is a good idea to have a new elbow on hand before you start attempting any repairs. By keeping an elbow pipe available, you will repair the break quickly and easily.
Step 1
Before you begin attempting to repair the broken elbow pipe in your sink, be sure that you turn off the water supply.
If there is not a shut-off valve located conveniently under the sink, then use the shut-off valve found where your main water supply line enters your home.
If there is no valve at this point, then you will need to cut off the water supply at your meter box.
Step 2
Remove the old elbow pipe by loosening the slip nuts on either side of it with a wrench.
Wrap each nut with several layers of Teflon tape and then screw them on tightly so they don’t leak.
Alternatively, loosen the clamp securing the dishwasher hose to the elbow, using a flathead screwdriver.
Pull the hose off and plug it in to prevent water from dripping out while you work.
Step 3
Remove the hose connecting the faucet to the elbow by unscrewing it, using an adjustable wrench.
Place a towel beneath both connections to catch any water that drips out of either end. Plug both ends immediately after removing them, then empty any water in the towel into a bucket or down a drain.
Step 4
Unscrew one nut on each end of the elbow, using pliers or a wrench, depending on whether they are metal or plastic nuts. Pull off one side of the elbow, then remove another nut and pull off another side. If there’s any corrosion on either side of the old elbow, gently scrape it off using a flathead screwdriver and wipe away any dirt with a rag.
Then apply flux to each end of the new elbow and slide it onto one side of each pipe until it’s about halfway on both sides.
Step 5
Place a bucket under the trap and remove it. This is a U-shaped part of the pipe that will have nuts on both ends. One end connects to the drainpipe and one end connects to another pipe going horizontally under your sink. The horizontal pipe is also a tailpiece and this is where your new elbow piece will go.
Step 6
After you get the trap removed locate your new part and make sure that everything lines up correctly with all of your other pipes. You want to be sure that your new part will fit correctly before installing it.
Once you know that everything fits correctly then proceed with connecting it in place of your old one using plumber putty between the tailpiece and your new part as well as between your drainpipe and trap where they connect at their threaded ends.
How to fix the Pipe Under The Kitchen Sink Leaking at the Connection
- First, you have to find the source of the leak.
- The sink drain will have an overflow, which is a small hole with a small tube attached. The tube has a little rubber plugin so it doesn’t leak, but if there is a disconnected tube, water will leak out of the overflow.
- If your sink lacks an overflow, then figure out where the water is coming from. If it is coming from above the drain basket and dripping directly into the cabinet, then it is probably coming from one of two places (although there could be other places).
- If it is dripping from above the drain basket and below the faucet, then you likely have a leaking faucet. Replacing the faucet should fix your problem.
- If it is dripping from much higher up than that (like at or above your cabinet door hinge), then you likely have a leaky pipe in your wall. You can fix this by replacing all of the plumbing pipes in your wall or by just replacing one section of the pipe.
- If you want to fix it yourself, there are several ways to do this depending on what type of pipes your home has and what type of materials you want to use for repairs and replacement.
- For example, first, turn off the water supply. Remove the sink trap using a bucket underneath to catch any water left in the pipes. Remove the C-clip with pliers (it has a square hole in it). Now use an adjustable wrench to unscrew the nut that holds on the connector that you will be replacing.
- Remove the old connector and inspect it for damage or wear and tear, which is likely what caused your leak in the first place. Replace if necessary and do not forget to use Teflon tape before you reassemble it all back together.

As a homeowner, I am specifically keen on home improvement. I am passionate about homes, yards, and home improvement. I blog on home ideas and reviews on solutions that make homes better.