Whether you are a homeowner, landlord, or DIYer, you are bound to run into a plumbing problem at some point. It is common for the kitchen sink and plumbing to cause a headache for the homeowner when you have to do some work on this area of the house.
In this post, you will learn how to plumb a kitchen sink properly by using our kitchen sink plumbing diagram. Read on.
How to Plumb a Kitchen Sink
Assuming a new kitchen sink installation, you will need the following materials:
- Sink. You can buy this at your local home improvement store.
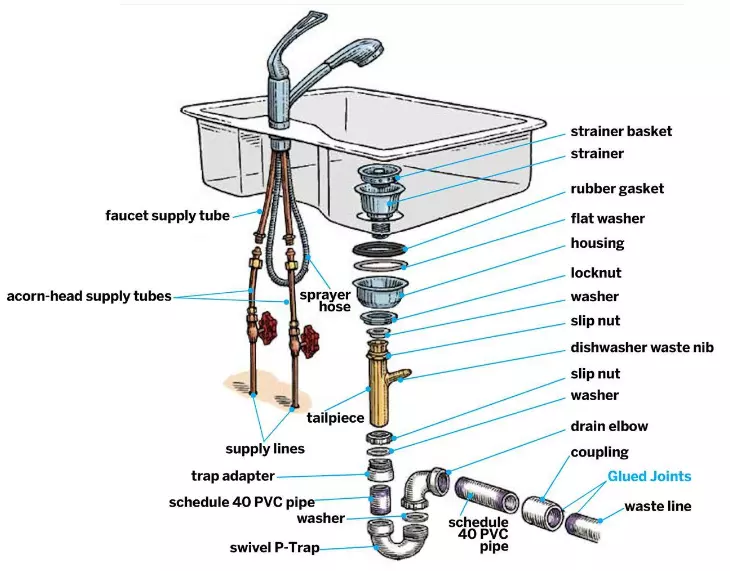
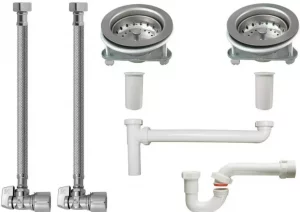
- Drain assembly kit. This includes a waste elbow, tailpiece, trap arm, and extension tube.
- P-trap. Use a 1-1/2 inch P-trap for double sinks and a 1-1/4 inch P-trap for single sinks. Both sizes are universal and fit all standard-sized drain openings.
- Supply tubes (if you don’t already have these installed). These are usually made of copper or CPVC (chlorinated polyvinyl chloride) and come in 3-foot sections. They should be no more than 6 feet in length to avoid pressure loss at the faucet head.
Choose either 1/2 inch or 3/8 inch supply tubes depending on how far the sink is from the shutoff valve on the wall. The larger the distance, the bigger the pipe you need to use to maintain good water pressure at the faucet head.
Steps
STEP 1
Turn off the water and drain the pipes.
STEP 2
Remove the old sink. Use a putty knife to loosen and remove the putty around the drain opening. Unscrew and remove the metal drain flange from underneath the sink. You may have to use a pipe wrench or pliers to loosen it. If you see any water stains under the sink, soak them up with paper towels or a sponge.
STEP 3
Remove any silicone caulk or putty from around the edge of the countertop opening with a putty knife. Scrape off all traces of adhesive caulk from under the countertop edges with a razor blade. Pull out all old plastic clips that hold the sink in place (you may need a flat screwdriver to pry them out). Lift out the old sink and set it aside.
STEP 4
Inspect your new sink. Check that there are no dents, scratches, chips, or other imperfections in it; if there are, return it for another one before proceeding. Look for any protective plastic film covering the surface; if there is any, carefully peel off this film and discard it now. Inspect both sides of each faucet hole in your new sink for rough edges.
STEP 5
Attach a supply tube to each faucet and run it through the hole in the countertop, if necessary, to connect it to both hot and cold water supply lines under the sink cabinet.
Connect both supply tubes to their respective shutoff valves, turning them clockwise until they are tight enough that you can no longer turn them by hand.
Attach a P-trap to either a tailpiece or drainpipe with two slip nuts and two gaskets, then connect this assembly to the drain stub-out in the wall underneath the sink with another slip nut and gasket.
Kitchen Sink Plumbing Diagram
How to Maintain Your Kitchen Sink Plumbing
A kitchen sink that works properly is essential to any household. When a problem arises, it is important to know how to fix the issue without damaging the entire plumbing system. The following tips will help you keep up with the maintenance of your kitchen sink plumbing.
1. Checking for Leaks
First, check underneath your sink and make sure there is no water leaking from the faucet or drain pipe. Next, turn on the water and look for any water leaking from where the supply lines hook up with the faucet.
If you do see any leaks, turn off the water supply by turning the valve clockwise and make sure that both of these areas are tight and secure. Be careful not to over-tighten them because too much pressure can cause a leaky pipe.
2. Checking for clogs
If you notice a slow drain in your kitchen sink, have a plunger handy so that you can attempt to dislodge a potential clog. If that does not work, use an auger to remove any blockage in your drain line. To be certain there are no other issues with your drains, check to see if there are any other clogged drains in your home.
You mustn’t put anything down your drain that could cause clogs, such as grease or fibrous foods like corn husks and artichokes. This can also include over-the-counter cleansers that are not meant for kitchen sinks. Make sure to read the labels on these products before using them in your sink.
3. Clean out the drain
A clogged drain is a serious health hazard, especially if it is near food preparation surfaces or areas where children play. To clean out the drain, use a drain cleaner or pipe snake to loosen any debris that has been collected in the pipes. This will allow the flow of water to be restored. Also, make sure that the faucet is not leaking before you use it again after cleaning it out.
Preventative maintenance can go a long way towards keeping your sink clean and your pipes clear. Every day, wipe the sides of the sink with a sponge or paper towel. This will remove any grease or food particles so they don’t get washed down the drain and stick to the pipe walls. Never pour grease down a sink drain! This is one sure way to clog it up fast.
4. Use strainers
This tip goes hand-in-hand with keeping it clean and will prevent any food from getting stuck in the drain pipes. If you have a garbage disposal, install a strainer basket in the bottom of the unit to catch any food scraps before they go down the drain. This will prevent clogged pipes and potential damage to the disposal unit.
5. Use hot water at least once per week
Pour an inch or two of water into the bottom of the sink and bring it to a boil on the stove. Carefully pour the boiling water down the drain. This will help to clear out any debris that’s blocking the drain. If the water drains slowly, your pipes are probably completely blocked.
Also, use baking soda and vinegar periodically to clean out your drains, but do not use them if you have garbage disposal because it will cause corrosion. You should also use an enzyme-based cleaner periodically if you want to keep your drains clear of buildup and running smoothly.
6. Do not use chemical drain cleaners
Such products are very harsh on pipes and could cause major damage if used too often or without care. Chemical cleaners should only ever be an option as a last resort.
If your drains have a stubborn blockage that won’t budge even after plunging and snaking, then it’s time to use chemicals. But instead of using store-bought products, try making your own first with household ingredients like baking soda, vinegar, and salt. If these natural remedies do not work, then it is time for something stronger.
7. Repair Broken Parts
Repair any broken parts of your kitchen sink plumbing system. Sometimes you may find that many broken parts of your plumbing system need to be replaced before they cause more damage. If you don’t replace them right away, they can lead to more mess.
Double Kitchen Sink Plumbing Diagram

Single Kitchen Sink Plumbing Diagram
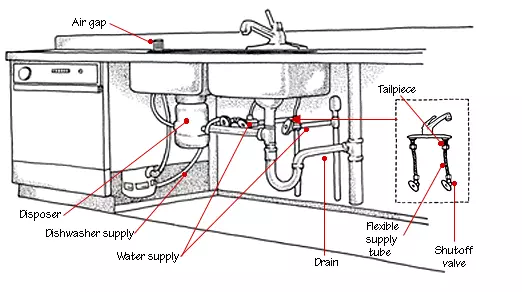
Kitchen Sink Plumbing Diagram with Dishwasher

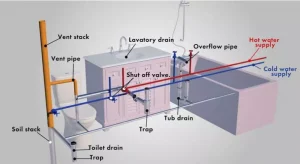
Kitchen Sink Drainage System
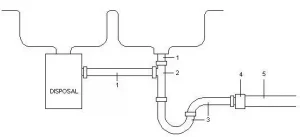
Kitchen Sink Plumbing Diagram with Garbage Disposal
Kitchen sink plumbing kit

As a homeowner, I am specifically keen on home improvement. I am passionate about homes, yards, and home improvement. I blog on home ideas and reviews on solutions that make homes better.